SOLIDWORKS CAM Standard and SOLIDWORKS CAM Professional allow users to create CNC toolpaths directly inside SOLIDWORKS, eliminating the need to export geometry to third-party CAM software. By integrating manufacturing directly with design, SOLIDWORKS CAM helps reduce errors, save time, and maintain design intent throughout the production process.
This guide walks through how to install SOLIDWORKS CAM Standard or CAM Professional using the SOLIDWORKS Installation Manager. We will discuss the licensing requirements, common installation issues, and how to activate CAM once installation is complete.
What is SOLIDWORKS CAM?
SOLIDWORKS CAM is an integrated computer-aided manufacturing solution built directly into the SOLIDWORKS interface. It enables users to define machining operations, generate CNC toolpaths, select cutting tools, and simulate machining directly from their part and assembly models.
 Integrated programming with SOLIDWORKS CAM
Because SOLIDWORKS CAM is integrated within the SOLIDWORKS environment, there is no need to translate geometry between design and manufacturing software. This tight integration helps streamline workflows, reduce translation errors, and ensure that toolpaths remain synchronized with design changes.
SOLIDWORKS CAM is available in two versions:
- SOLIDWORKS CAM Standard: Included with an active SOLIDWORKS subscription
- SOLIDWORKS CAM Professional: A separately purchased product with its own serial number
Important Licensing Notes
Keeping your SOLIDWORKS subscription current ensures uninterrupted access to CAM Standard features.
Before installing, it is important to understand the licensing requirements:
- SOLIDWORKS CAM Standard requires an active and up-to-date SOLIDWORKS subscription service. The software entitlement is tied directly to subscription status, and it will not run if the subscription lapses.
- SOLIDWORKS CAM Professional is a purchased add-on and requires a separate serial number in addition to your SOLIDWORKS serial number.
How to Install SOLIDWORKS CAM
- Open the Programs and Features in Windows by navigating to Control Panel > Items > Programs and Features.
- Locate SOLIDWORKS, highlight it, and select Change at the top of the screen.
 Changing an installed Windows program
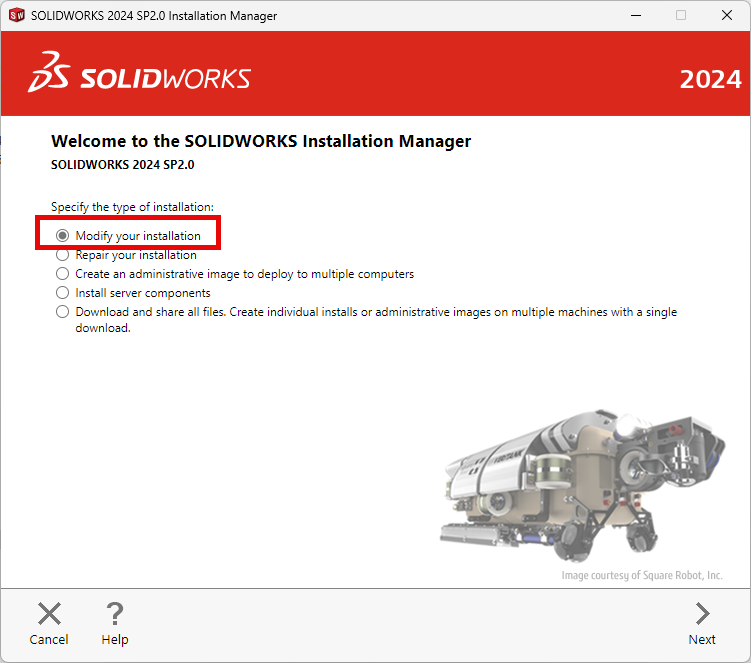
 - In the SOLIDWORKS Installation Manager, select Modify your installation.
 Modifying the SOLIDWORKS Installation
 - Confirm the serial numbers listed are correct. If you purchased SOLIDWORKS CAM Professional separately, input it here.
 Inputting a SOLIDWORKS CAM serial number
 - On the Product Selection screen, ensure the SOLIDWORKS CAM is selected.
 Selecting SOLIDWORKS CAM to be installed
 - Proceed through the remaining prompts to install SOLIDWORKS CAM.
Additional Support for SOLIDWORKS CAM
Our team is here to support you beyond installation to ensure you get the most value from SOLIDWORKS CAM. Whether you need help with setup, customization, or skill development, we offer a range of assistance options tailored to your manufacturing needs.
In addition to traditional technical support, we also offer training options designed to help users build confidence and efficiency with SOLIDWORKS CAM. Our team will work with you to understand your goals and recommend the best solution to support your design-to-manufacturing workflow.
Going Beyond Installing SOLIDWORKS CAM
Installing SOLIDWORKS CAM Standard or SOLIDWORKS CAM Professional is a straightforward process that unlocks powerful CNC programming capabilities directly within SOLIDWORKS. Once enabled, you can generate accurate toolpaths from your part models, simulate machining operations, and prepare your data for CNC production without leaving the SOLIDWORKS environment.
By using SOLIDWORKS CAM as an integrated manufacturing solution, users can streamline workflows, reduce reliance on third-party CAM software, and maintain consistency between design intent and manufacturing output. This integration helps save time, minimize errors, and improve overall shop-floor efficiency.
Running into issues installing SOLIDWORKS CAM? Report an issue with our Technical Support team here.
PakarPBN
A Private Blog Network (PBN) is a collection of websites that are controlled by a single individual or organization and used primarily to build backlinks to a “money site” in order to influence its ranking in search engines such as Google. The core idea behind a PBN is based on the importance of backlinks in Google’s ranking algorithm. Since Google views backlinks as signals of authority and trust, some website owners attempt to artificially create these signals through a controlled network of sites.
In a typical PBN setup, the owner acquires expired or aged domains that already have existing authority, backlinks, and history. These domains are rebuilt with new content and hosted separately, often using different IP addresses, hosting providers, themes, and ownership details to make them appear unrelated. Within the content published on these sites, links are strategically placed that point to the main website the owner wants to rank higher. By doing this, the owner attempts to pass link equity (also known as “link juice”) from the PBN sites to the target website.
The purpose of a PBN is to give the impression that the target website is naturally earning links from multiple independent sources. If done effectively, this can temporarily improve keyword rankings, increase organic visibility, and drive more traffic from search results.